Spring Security(五)-- 动手实现一个 IP_Login

在开始这篇文章之前,我们似乎应该思考下为什么需要搞清楚 Spring Security 的内部工作原理?按照第二篇文章中的配置,一个简单的表单认证不就达成了吗?更有甚者,为什么我们不自己写一个表单认证,用过滤器即可完成,大费周章引入 Spring Security,看起来也并没有方便多少。对的,在引入 Spring Security 之前,我们得首先想到,是什么需求让我们引入了 Spring Security,以及为什么是 Spring Security,而不是 shiro 等等其他安全框架。我的理解是有如下几点:

1 在前文的介绍中,Spring Security 支持防止 csrf 攻击,session-fixation protection,支持表单认证,basic 认证,rememberMe… 等等一些特性,有很多是开箱即用的功能,而大多特性都可以通过配置灵活的变更,这是它的强大之处。

2 Spring Security 的兄弟的项目 Spring Security SSO,OAuth2 等支持了多种协议,而这些都是基于 Spring Security 的,方便了项目的扩展。

3 SpringBoot 的支持,更加保证了 Spring Security 的开箱即用。

4 为什么需要理解其内部工作原理? 一个有自我追求的程序员都不会满足于浅尝辄止,如果一个开源技术在我们的日常工作中十分常用,那么我偏向于阅读其源码,这样可以让我们即使排查不期而至的问题,也方便日后需求扩展。

5 Spring 及其子项目的官方文档是我见过的最良心的文档!~~ 相比较于 Apache 的部分文档 ~~

这一节,为了对之前分析的 Spring Security 源码和组件有一个清晰的认识,介绍一个使用 IP 完成登录的简单 demo。

5 动手实现一个 IP_Login

5.1 定义需求

在表单登录中,一般使用数据库中配置的用户表,权限表,角色表,权限组表… 这取决于你的权限粒度,但本质都是借助了一个持久化存储,维护了用户的角色权限,而后给出一个 /login 作为登录端点,使用表单提交用户名和密码,而后完成登录后可自由访问受限页面。

在我们的 IP 登录 demo 中,也是类似的,使用 IP 地址作为身份,内存中的一个 ConcurrentHashMap 维护 IP 地址和权限的映射,如果在认证时找不到相应的权限,则认为认证失败。

实际上,在表单登录中,用户的 IP 地址已经被存放在 Authentication.getDetails() 中了,完全可以只重写一个 AuthenticationProvider 认证这个 IP 地址即可,但是,本 demo 是为了厘清 Spring Security 内部工作原理而设置,为了设计到更多的类,我完全重写了 IP 过滤器。

5.2 设计概述

我们的参考完全是表单认证,在之前章节中,已经了解了表单认证相关的核心流程,将此图再贴一遍:
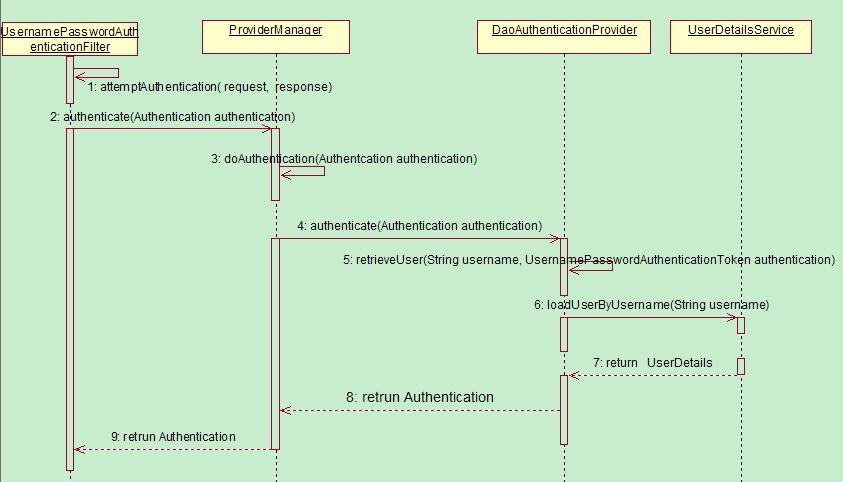
https://kirito.iocoder.cn/2011121410543010.jpg

在 IP 登录的 demo 中,使用 IpAuthenticationProcessingFilter 拦截 IP 登录请求,同样使用 ProviderManager 作为全局 AuthenticationManager 接口的实现类,将 ProviderManager 内部的 DaoAuthenticationProvider 替换为 IpAuthenticationProvider,而 UserDetailsService 则使用一个 ConcurrentHashMap 代替。更详细一点的设计:

  1. IpAuthenticationProcessingFilter–>UsernamePasswordAuthenticationFilter
  2. IpAuthenticationToken–>UsernamePasswordAuthenticationToken
  3. ProviderManager–>ProviderManager
  4. IpAuthenticationProvider–>DaoAuthenticationProvider
  5. ConcurrentHashMap–>UserDetailsService

5.3 IpAuthenticationToken

1
2
3
4
5
6
7
8
9
10
11
12
13
14
15
16
17
18
19
20
21
22
23
24
25
26
27
28
29
30
31
32
33
34
35
36
public class IpAuthenticationToken extends AbstractAuthenticationToken {

private String ip;

public String getIp() {
return ip;
}

public void setIp(String ip) {
this.ip = ip;
}

public IpAuthenticationToken(String ip) {
super(null);
this.ip = ip;
super.setAuthenticated(false);// 注意这个构造方法是认证时使用的
}

public IpAuthenticationToken(String ip, Collection<? extends GrantedAuthority> authorities) {
super(authorities);
this.ip = ip;
super.setAuthenticated(true);// 注意这个构造方法是认证成功后使用的

}

@Override
public Object getCredentials() {
return null;
}

@Override
public Object getPrincipal() {
return this.ip;
}

}

两个构造方法需要引起我们的注意,这里设计的用意是模仿的 UsernamePasswordAuthenticationToken,第一个构造器是用于认证之前,传递给认证器使用的,所以只有 IP 地址,自然是未认证;第二个构造器用于认证成功之后,封装认证用户的信息,此时需要将权限也设置到其中,并且 setAuthenticated(true)。这样的设计在诸多的 Token 类设计中很常见。

5.4 IpAuthenticationProcessingFilter

1
2
3
4
5
6
7
8
9
10
11
12
13
14
public class IpAuthenticationProcessingFilter extends AbstractAuthenticationProcessingFilter {
// 使用 /ipVerify 该端点进行 ip 认证
IpAuthenticationProcessingFilter() {
super(new AntPathRequestMatcher("/ipVerify"));
}

@Override
public Authentication attemptAuthentication(HttpServletRequest request, HttpServletResponse response) throws AuthenticationException, IOException, ServletException {
// 获取 host 信息
String host = request.getRemoteHost();
// 交给内部的 AuthenticationManager 去认证,实现解耦
return getAuthenticationManager().authenticate(new IpAuthenticationToken(host));
}
}
  1. AbstractAuthenticationProcessingFilter 这个过滤器在前面一节介绍过,是 UsernamePasswordAuthenticationFilter 的父类,我们的 IpAuthenticationProcessingFilter 也继承了它
  2. 构造器中传入了 /ipVerify 作为 IP 登录的端点
  3. attemptAuthentication() 方法中加载请求的 IP 地址,之后交给内部的 AuthenticationManager 去认证

5.5 IpAuthenticationProvider

1
2
3
4
5
6
7
8
9
10
11
12
13
14
15
16
17
18
19
20
21
22
23
24
25
26
27
28
29
30
public class IpAuthenticationProvider implements AuthenticationProvider {
final static Map<String, SimpleGrantedAuthority> ipAuthorityMap = new ConcurrenHashMap();
// 维护一个 ip 白名单列表,每个 ip 对应一定的权限
static {
ipAuthorityMap.put("127.0.0.1", new SimpleGrantedAuthority("ADMIN"));
ipAuthorityMap.put("10.236.69.103", new SimpleGrantedAuthority("ADMIN"));
ipAuthorityMap.put("10.236.69.104", new SimpleGrantedAuthority("FRIEND"));
}

@Override
public Authentication authenticate(Authentication authentication) throws AuthenticationException {
IpAuthenticationToken ipAuthenticationToken = (IpAuthenticationToken) authentication;
String ip = ipAuthenticationToken.getIp();
SimpleGrantedAuthority simpleGrantedAuthority = ipAuthorityMap.get(ip);
// 不在白名单列表中
if (simpleGrantedAuthority == null) {
return null;
} else {
// 封装权限信息,并且此时身份已经被认证
return new IpAuthenticationToken(ip, Arrays.asList(simpleGrantedAuthority));
}
}

// 只支持 IpAuthenticationToken 该身份
@Override
public boolean supports(Class<?> authentication) {
return (IpAuthenticationToken.class
.isAssignableFrom(authentication));
}
}

return new IpAuthenticationToken(ip, Arrays.asList(simpleGrantedAuthority)); 使用了 IpAuthenticationToken 的第二个构造器,返回了一个已经经过认证的 IpAuthenticationToken。

5.6 配置 WebSecurityConfigAdapter

1
2
3
4
5
6
7
8
9
10
11
12
13
14
15
16
17
18
19
20
21
22
23
24
25
26
27
28
29
30
31
32
33
34
35
36
37
38
39
40
41
42
43
44
45
46
47
48
49
50
51
52
53
54
55
56
@Configuration
@EnableWebSecurity
public class WebSecurityConfig extends WebSecurityConfigurerAdapter {

//ip 认证者配置
@Bean
IpAuthenticationProvider ipAuthenticationProvider() {
return new IpAuthenticationProvider();
}

// 配置封装 ipAuthenticationToken 的过滤器
IpAuthenticationProcessingFilter ipAuthenticationProcessingFilter(AuthenticationManager authenticationManager) {
IpAuthenticationProcessingFilter ipAuthenticationProcessingFilter = new IpAuthenticationProcessingFilter();
// 为过滤器添加认证器
ipAuthenticationProcessingFilter.setAuthenticationManager(authenticationManager);
// 重写认证失败时的跳转页面
ipAuthenticationProcessingFilter.setAuthenticationFailureHandler(new SimpleUrlAuthenticationFailureHandler("/ipLogin?error"));
return ipAuthenticationProcessingFilter;
}

// 配置登录端点
@Bean
LoginUrlAuthenticationEntryPoint loginUrlAuthenticationEntryPoint(){
LoginUrlAuthenticationEntryPoint loginUrlAuthenticationEntryPoint = new LoginUrlAuthenticationEntryPoint
("/ipLogin");
return loginUrlAuthenticationEntryPoint;
}

@Override
protected void configure(HttpSecurity http) throws Exception {
http
.authorizeRequests()
.antMatchers("/", "/home").permitAll()
.antMatchers("/ipLogin").permitAll()
.anyRequest().authenticated()
.and()
.logout()
.logoutSuccessUrl("/")
.permitAll()
.and()
.exceptionHandling()
.accessDeniedPage("/ipLogin")
.authenticationEntryPoint(loginUrlAuthenticationEntryPoint())
;

// 注册 IpAuthenticationProcessingFilter 注意放置的顺序 这很关键
http.addFilterBefore(ipAuthenticationProcessingFilter(authenticationManager()), UsernamePasswordAuthenticationFilter.class);

}

@Override
protected void configure(AuthenticationManagerBuilder auth) throws Exception {
auth.authenticationProvider(ipAuthenticationProvider());
}

}

WebSecurityConfigAdapter 提供了我们很大的便利,不需要关注 AuthenticationManager 什么时候被创建,只需要使用其暴露的 configure(AuthenticationManagerBuilder auth) 便可以添加我们自定义的 ipAuthenticationProvider。剩下的一些细节,注释中基本都写了出来。

5.7 配置 SpringMVC

1
2
3
4
5
6
7
8
9
10
11
12
13
14
@Configuration
public class MvcConfig extends WebMvcConfigurerAdapter {

@Override
public void addViewControllers(ViewControllerRegistry registry) {
registry.addViewController("/home").setViewName("home");
registry.addViewController("/").setViewName("home");
registry.addViewController("/hello").setViewName("hello");
registry.addViewController("/ip").setViewName("ipHello");
registry.addViewController("/ipLogin").setViewName("ipLogin");

}

}

页面的具体内容和表单登录基本一致,可以在文末的源码中查看。

5.8 运行效果

成功的流程

  • http://127.0.0.1:8080/ 访问首页,其中 here 链接到的地址为:http://127.0.0.1:8080/hello

首页

  • 点击 here,由于 http://127.0.0.1:8080/hello 是受保护资源,所以跳转到了校验 IP 的页面。此时若点击 Sign In by IP 按钮,将会提交到 /ipVerify 端点,进行 IP 的认证。

登录

  • 登录校验成功之后,页面被成功重定向到了原先访问的

受保护的 hello 页

失败的流程

  • 注意此时已经注销了上次的登录,并且,使用了 localhost(localhost 和 127.0.0.1 是两个不同的 IP 地址,我们的内存中只有 127.0.0.1 的用户, 没有 localhost 的用户)

首页

  • 点击 here 后,由于没有认证过,依旧跳转到登录页面

    登录

  • 此时,我们发现使用 localhost,并没有认证成功,符合我们的预期

认证失败

5.9 总结

一个简单的使用 Spring Security 来进行验证 IP 地址的登录 demo 就已经完成了,这个 demo 主要是为了更加清晰地阐释 Spring Security 内部工作的原理设置的,其本身没有实际的项目意义,认证 IP 其实也不应该通过 Spring Security 的过滤器去做,退一步也应该交给 Filter 去做(这个 Filter 不存在于 Spring Security 的过滤器链中),而真正项目中,如果真正要做黑白名单这样的功能,一般选择在网关层或者 nginx 的扩展模块中做。再次特地强调下,怕大家误解。

最后祝大家国庆玩的开心 ~

本节的代码可以在 github 中下载源码:https://github.com/lexburner/spring-security-ipLogin

** 欢迎关注我的微信公众号:「Kirito 的技术分享」,关于文章的任何疑问都会得到回复,带来更多 Java 相关的技术分享。**

关注微信公众号

Spring Security(五)-- 动手实现一个 IP_Login

https://www.cnkirito.moe/spring-security-5/

作者

徐靖峰

发布于

2017-10-01

更新于

2021-04-07

许可协议


Your browser is out-of-date!

Update your browser to view this website correctly.&npsb;Update my browser now

×